Shrine For Frida!!!
This month the members of Designer Crafts Connection are playing around with a fun and shiny product. Make sure to start over at the DCC blog and check out what all the designers created.
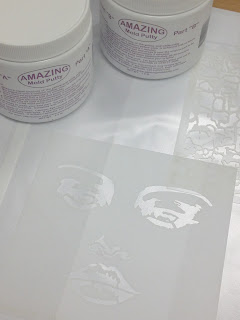
This product is called Rinea paper-foil, some of these sheets are double sided, so you get two beautiful colors to work with, also it's available in two textures, glossy plain and embossed, each texture is offered in 10 different colors, check it out here Rinea by Globalcrafting
This product is very easy to handle, pliable and so easy to work with. I wanted to create my very first Shrine to Frida Kahlo and this product was perfect to make all the shiny embellishments. This product is so thin that you can cut it with any cutting tools, for this particular project I used my tiny scissors from Westcott.
This is a recycled project as well, here you can see the box I used for this project, perfect size too.

First thing I did was cut the lid off, and shaped and trim to size to make the top of my shrine.

Once I glued the the top to the rest of the box, I jumped into painting right away and forgot to take a photo before the painting started. Here I give you my recycled painted shrine box. So ready to start embellishing the outside and the inside.

First thing I did was download a black and white picture of Frida, I cut out the image out and started a background for it, no planning here, it all came together step by step. Here I used another piece of recycled cardboard.


I had to give her a crown, so here you see a gold and purple crown, and the beginning of the background for her.

I cut out individual petals from the blue foil, that were glued onto the background piece, as seen on the photo below. I also added gold petals behind the blue ones, these were much larger, and once the glue dried I decided to cut up the blue petals and roll them in a bit, then just by pressing in the center of the gold foil petals, they took shape, that's how soft and pliable this material is.


To finish up the piece I added tiny white drops in shapes of flowers, and two water bottle caps glued to the bottom to use as legs. Here I give you my finished "Shrine to Frida". This product really made it so easy for me to create this fun piece.

If you have not tried this, I hope you give it a try, go check out their site.
Materials used:
Recycled cardboard boxes
DecoArt Patio Paints in several colors
Westcott scissors & hobbyknife
Frida image
Magazine pages
Paint brushes
Rinea Paper-Foil Globalcrafting - assorted colors and texture
Beacon 3-IN-1 glue
This is a sponsored post, I was provided product in exchange for my creative ideas, views and opinions.
This product is called Rinea paper-foil, some of these sheets are double sided, so you get two beautiful colors to work with, also it's available in two textures, glossy plain and embossed, each texture is offered in 10 different colors, check it out here Rinea by Globalcrafting
 |
| Here are the two types of paper-foil I received to play with |
This product is very easy to handle, pliable and so easy to work with. I wanted to create my very first Shrine to Frida Kahlo and this product was perfect to make all the shiny embellishments. This product is so thin that you can cut it with any cutting tools, for this particular project I used my tiny scissors from Westcott.
This is a recycled project as well, here you can see the box I used for this project, perfect size too.

First thing I did was cut the lid off, and shaped and trim to size to make the top of my shrine.

Once I glued the the top to the rest of the box, I jumped into painting right away and forgot to take a photo before the painting started. Here I give you my recycled painted shrine box. So ready to start embellishing the outside and the inside.

First thing I did was download a black and white picture of Frida, I cut out the image out and started a background for it, no planning here, it all came together step by step. Here I used another piece of recycled cardboard.

Now to the fun part, choosing the colors and texture, I went for the solid pieces first, I used the purple to start my background for Frida's image.


I had to give her a crown, so here you see a gold and purple crown, and the beginning of the background for her.

I cut out individual petals from the blue foil, that were glued onto the background piece, as seen on the photo below. I also added gold petals behind the blue ones, these were much larger, and once the glue dried I decided to cut up the blue petals and roll them in a bit, then just by pressing in the center of the gold foil petals, they took shape, that's how soft and pliable this material is.

Here you can see the final piece, this is to go in the inside of the shrine in the center. Where I painted a checker background to make it look as if they were tiles. You can also see her double color crown with a big gold piece on the center of it. I also cut up two tiny little flowers and leaf, to add at the bottom of her image. Now I had been working with resin on another project and I had a little bit let over that was colored with red dye, so I added some to the gold piece on her crown, on her lips and on her dress.

I found a picture of a painters pallet and brushes and a butterfly in a magazine and thought these would be nice to add, along with some tiny art stamps that were perfect for this project. She was all about art. I took my time and hand cut a lot of tiny flowers, leaves and stars out of the paper foils from all different colors, these were glued all over the shrine, below you can see close-up photos of these little embellishments


Here's how I made the flaming hearts that decorate the top of the shrine. So easy and look how tiny are my scissors, these were perfect to cut these tiny embellishments.


Materials used:
Recycled cardboard boxes
DecoArt Patio Paints in several colors
Westcott scissors & hobbyknife
Frida image
Magazine pages
Paint brushes
Rinea Paper-Foil Globalcrafting - assorted colors and texture
Beacon 3-IN-1 glue


Comments
Post a Comment