Posts

Showing posts with the label jewelry

Amazing Crafting Products and Jewelry, a perfect Match!!!

Go check out my latest projects using Amazing Casting Products!!! If you have not tried these, I recommend you give them a try, they make crafting more fun and more creative!!!! http://amazingmoldputty.blogspot.com/2013/07/jewelry-and-amazing-crafting-products.html

Polka Dot Jewelry

Image
So I made a stop at Hobby Lobby one day and looking for white ribbon spools and found a nice white polka dot ribbon, and then a black and well there were lots of different colors. Well I did get the white ribbon I originally was looking for; these polka dot were extra and just got them because they are pretty and are my favorite two colors. The first photo shows a set I designed exclusively for LIMIRI, LLC.  Here is a set of cuff and ring, made out of paper (paper was cut using Quick Snippers) white and black polka dot fabric ribbons and beads, made exclusively for LIMIRI, LLC I was making some jewelry and decided to turn to the polka dotted ribbons and well I like them as they are, since they are already glittered, I didn't want to add any beads or crystals.  These earrings are as light as feathers. I decided to cut out the dots only, by leaving a little of the sheer fabric to keep the dots all in one piece.  Here I used the black polka dot ribb...

Poly Bird necklace

Image
So one day I decided to play around with different colors of polymer clay and make all sort of beads - different sizes and different shapes and well different designs/colors - now this is what I do at times, just make beads and charms out of clay for future use.  So on another day I set out to create some jewelry with the beads I had made earlier.  I made all sort of items, from earrings, to bracelets, rings and necklaces.  This one if a favorite because I used a bead I made into the shape of a little bird - I use this bird in some of my sketches and decided to make it out of of clay - so here is the finished necklace - hope you like it, I know I do! this is Poly Bird Necklace here are some more beads waiting to be strung and here are some more - since I liked my birdie bead - I'm going to make some more to use on  other jewelry items. Please feel free to leave me any comments.  Thanks for stopping by!

Crocheting around, my way!

Image
I just wanted to go back a little and show some of the works I have done in the past and where I'm at today.  Now I love working with different mediums.  I've seen some amazing works on blogs, on-line and even on FB that inspire me to go in a totally new direction to what I'm used to making, this is going to take some time, because it is not easy for me step outside the line and say it's ok, there are no lines, no rules, just let it all be what it wants to be. I do some crocheting, I have in the past made the scarfs, hats, even sweaters, but I'm not there anymore, don't get me wrong, I love these- I've seen some amazingly creative crocheting on-line, but I just want to make jewelry with it - so here are a few items I've done using a crochet hook and yarn. If you start from the top left - I used two types of yarn, yet you only see the green -  this is a really pretty bracelet and  the best part is that the beads are small and light so when you wear...

Rings, rings, rings......

Image
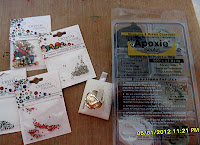
 RINGS, RINGS, RINGS........ you just can't have too many rings, not ever!!!! I LOVE making jewelry- and I love big Rings, specially if they have crystals - or should I say if I use crystals.  Above is a picture of the last rings I've done. I've done rings using wire, nylon thread, and now using Plaids ring findings, and Apoxie Sculpt.   Below I will add a couple of pictures showing all the materials used to make these rings.  Now as you can see, all I needed to make the ring was the apoxie, the crystals and Plaids silver ring finding, now since I used the clear crystals, I used the gray apoxie, I didn't like how the gray looked against all the sparkle from the crystals - so I used Tim's silver and with a blotter brush I brushed all the exposed apoxie on the ring, now it is silvery sparkly and LOVE wearing it - specially on a sunny day - you can see all the glittery lights just floating around.  Here is how the ring looked after the apoxie dried...

Ring of Hearts!

Image
Well finally got my shipment from Fire Mountain Gems.  I didn't pay attention to the size of the swarovski rhinestones I ordered, but turns out they were the perfect size for the ring I got.   Here is a picture of all the materials I used for this ring.  These is everything I used to make my ring Here is a closeup of the rhinestones and the ring blank Here is a picture of the apoxie - I used the white and the black - this is a two part so you have to use equal amounts of the colored apoxy and the gray - you mix them together until you no longer see the gray - otherwise it will not work. Here is part of the video I made to show how I made this ring using these 2 part apoxie, figure it would be easier to show, than typing the instructions.  The rest of the video is going on my youtube channel. 12 Hours later this is the finished ring, now this is the first ring I make using this blank ring and these incredibly tiny, tiny rhinestones, now I have n...

New jewelry - New product! So many possibilities!

Image
I started using a molding compound known as , Apoxie® Sculpt, 2-part epoxy.  It comes in different colors and a while ago I ordered the black one. I ordered from  http://www.firemountaingems.com  and I liked the results of my first few projects so I ordered a pack of different colors, that I can't wait to get.  This is such and easy product to use - I wish I had started using it when I first order it - but since I'm always working on other projects , I left this alone for too long.  My goal is to make my own rings from this material alone.  I also ordered  Swarovski crystal  rhinestones in different colors and sizes so I can bling my rings! LOL Here are pictures of the three rings I've done so far and I also made a pendant - these are all free form made, had no idea what I was going to make when I started to work on these and well these are the final results - I LOVE, LOVE wearing my rings, you can see the sparkle of the beads I used even in the...

Quick Snippers + Paper = Jewelry & Accessories!!

Image
I was asked to make some jewelry and hair accessories by using Quick Snipper and paper.  Now I have done jewelry with just about everything, from recycled clothes, beads, yarn, clay, duck tape, but not once did I think about using paper, until I was invited by LIMIRI, LLC to design some jewelry and accessories for them using the great Quick Snippers - what is Quick Snippers?  it's a great tool that consists of 6 scissors in one, each has a different design pattern.  These are just a few of the items I have created.  I have to admit that at the beginning I asked myself how can I use paper to create jewelry. Well after I cut my first shape, it was easy to just keep on cutting different papers and I was hooked.  I love making jewelry, love creating new designs every time.  I am so happy I was invited to make paper jewelry with this great tool.  Now lets face it a lot of us craft on the go, I know I do, weather it's paper, clay or duck tape; I always...

Red Duck Tape Rose Ring!

Image
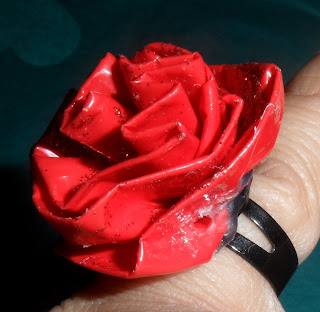
 I started working with duck tape since March of this year.  It has been fun making different types of projects with this product.  I've had the most fun making flowers out of it - I have used these flowers to decorate headbands, hair clips, purses/wallets that are made out of duck tape too.  Well this past weekend I decided to make a flower small enough to make a ring with it - and so I did.  Below are pictures of the finished ring, as well as a few steps of how-to make one and a list of products I used - I hope you like this, I sure had a lot of fun making it and it's my first of many jewelry items that I will make using duck tape. Here is the finished ring! Now here is a list of the first items I used to make this flower ring, below you will see what else I end up using to finish this ring. 1. Red duck tape sheet 2. Friskars cutting mat 3. Westcott's cutting knife 4. Ad Tech glue gun and high temp glue sticks 5. Black metal ring base (don't have bra...

May Arts - Back to The Beach! Jewelry

Image
 I wanted to make some jewelry using some of the ribbons from May Arts . Here are two bracelets I came up with today. Hope you like them.    here I used some of beadalon memory wire and some german wire - 1. strung the ribbon on the memory wire along with some pearls until all the wire was covered with ribbon and pearls. 2. used two open end crimps at the ends of the wire and ribbon using my pliers I closed the crimps. 3. took some of the german wire 20 g. and strung some pearls at the end a shell and turned them into dangles added to the crimps - one on each end of the wire, bracelet done and ready to wear. Here is the finished bracelet all ready to wear - it is really light and you hardly feel it when it's on. I gathered all these items to see what I would come up with; recycled jeans, piece of a white blouse, May Arts ribbon, fabric tac, white velcro, some assorted pearls and shells and my favorite scissors - well  I did not use the white fabric after ...