Posts

Showing posts with the label paint

Resin, resin, resin, so much fun!!!

Image
I'm a guest designer over at  http://amazingmoldputty.blogspot.com/  and have been working with all their different products.  I love everything so far, yes I have learned to make molds, to play with clear and casting resin, to use dyes and metallic powders, it has been a very amazing experience.  I love that I can use these products in many other ways, not just making molds and pouring resin to make objects.  I hate wasting, so in the process of learning how to use resin, I had some spillage here and there and once the resin was dried in the plastic cup I was using, I found it it comes right off, in the shape of the bottom of the cup, and is so easy to cut, so I've kept a few to use later on. Well this past weekend I felt like playing around with some of the resin and some of the stuff I've done already, so I made these two images to be used as Halloween cards, but after looking at them for a bit longer, I think I might convert these into Halloween frames or ...

4th of July!!!

Image
I decided to make an etched project representing the 4th of July celebration coming up. I read somewhere that once you try etching, you can get hooked, and that is so true.  I had fun cutting out the vinyl to make my glass designs.   It is an easy project and I had a hard time deciding if I should leave it alone once the etching was done, or if I should paint it, and well the paints won.   I can't wait to use this as a candle holder.  Here is a brief photo tutorial showing how this project was done. Make sure your glass is clean before adding your stencils.  I hand cut my vinyl stars and strips, I suggest to have an idea of how you want to place your cut outs before you remove the backing from the vinyl. Once your stencils are in place make sure to press on the vinyl really good to keep the etching cream from going under your vinyl images. You can now begin adding the etching cream, start from the top of your glass, I suggest you protect your...

Bird of Freedom

Image
Over six years ago I started painting on wood - I got some serving trays from Michaels stores and made three different projects - loved all three and had many people that wanted to buy them but I refused to sell them.  Well two years ago I took them to an art fair where I was selling some of my work.  I had made two more - all different and well it just so happened that I sold all but one- this was sold and I do miss it hanging on my wall. I get attached to a lot of my work, some more than others, this one took a long time  first I just painted the bird and the tray, then later I went back and added all the embellishments, then last I added resin to the design to protect it, and well now it can hang or can be used as a tray. Just wanted to share one of my earlier works.  I need to get back to painting soon.  I just need to find more time in a day.  Hope you like my project, feel free to leave a comment.

Mod Podging Around!

Image
So I wanted to share other projects I have done in the past using wood frames, acrylic & glitter paint by Plaid; sequins, paper, glitter, Quick Snippers and mod podge.  Now I am not or have I ever used the sequins that come all strung together, the ones I use are all lose and have tons and tons of these in different colors. So I decided to use them on these frames, now how long it took, who knows, all I know is it was a really long time, and it actually helped me to relax. I didn't do any sketches, once I started it all just took shape on it's own.  I Love each of these frames, but my two favorites are the multi color with different designs, and of course the one I made for my daughter's picture of her sweet 15th bday.   this is the "NICOLE" frame - I first painted it all in pink and used glitter while the paint was wet around the heart leaving enough space to add sequins to the border of the heart, I mod podge each sequin at a time.  trying to keep the pa...

"Love" frame

Image
This frame can be used for anyone in mind from sister to mother, to wife, etc. I wanted to make a romantic frame after making two Halloween frames. Here are the materials I used to make this frame: Plaids heart wood frame Plaids apple barrel pure silver Plaids folkart extreme glitter in silver Chipboard letters I got from a kit i got from Charity wings - they had a web show from last CHA Tim Holtz distress ink fired brick 3-D butterflies (don't have the brand name) Recolections glitter adhesive borders - black flowers Adtech hot glue Ranger liquid pearls petal pink First step was to paint the entire frame in pure silver - decided to paint with the silver extreme glitter right away before the pure silver dried. Once the paint was completely dried - I hot glued the leaves and then the flowers until I had something I liked I added the black glittered flower border and placed it on the bottom of the frame and a small piece on the top of the frame as you see on the photo...

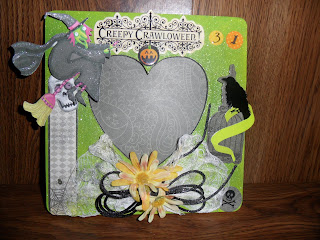
Creepy Crawloween

Image
So I decided to make another Halloween frame, after purchasing DCWV Halloween stock and stickers and K&Company embellishments.  Here is a picture of the final frame. the materials I used to make this frame are: Plaids heart wood frame Plaids apple barrel kiwi paint Plaids folk art extreme glitter peridot Plaids folk art extreme glitter silver DCWV Halloween stock & stickers K&Company embellishments Cheese cloth Hampton art pigment ink - black May Arts #SY10 Artificial flowers from Michaels Helmar 450 Helmar Zapdots 3D double sided adhesive in white So the first step was to paint the entire frame with the kiwi color, once dried completely I painted the entire front of the frame with peridot and set to dry while I decided what papers to use and where and how they would go. Decided to use a small strip of paper on the side of the frame, my intention was to use more paper - but I really loved the paint all that beautiful glitter I just didn't want to cover i...

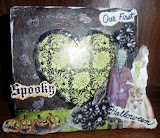
Our First Spooky Halloween

Image
I got some of DCWV Halloween stack and stickers recently at JoAnn's and have to say I love this paper - so I decided to make a picture frame       I used plaid's apple barrel black and orange paints to paint the frame - trying to make it look like a spooky Halloween night!  I also did a bit of stamping on the wood frame as you can see in one of the pictures here - used black embossing powder to outline the heart center of the frame and the white embossing powder for the tiny little ghosts - which later decide to emboss the inside.  I used Tim's distress stickles and just spread with my fingers all over the black and orange paint - you would need to look at the actual frame to see all the distressing - I also took a little bit of plaids apple barrel pure silver and distressed the edges of the frame.  I truly enjoyed making this frame and just loved the final result. Here is a list of materials I used to make this frame: I used Helmar 450 ...

ALL DENIM HEADBAND

Image
So last night I went up to my craft room and was not sure what to work on - I had been working with polymer clay for last couple of days and had all my materials on the table - decided to play with some alcohol inks on a luthrador sheet - finish coloring and well was not sure what to do with it, so I looked and looked around trying to see what I would really love to make. I noticed the blank white plastic headbands I got from Michaels - saw all the pieces of denim from the pants I cut into shorts for my daughter - so I decided to make some headbands - days earlier I had covered one this headbands with dark blue denim in a patch form and left it alone not sure what to do with it next - well I decided to take the white denim and used some therm o web glue dots cut it up and added to the headband underneath - them used the hi temp glue gun and glue and started gluing the white denim as a wrapped it around the plastic headband Well I decided once I was done wrapping to make a flower o...