Posts

Showing posts from January, 2012

Festive Friday Hop!!!!

Image
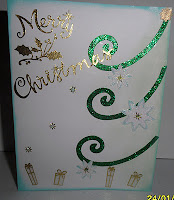
Good morning everyone and welcome to the second Festive Friday Blog Hop 2012.   It has been a challenge for me to create Christmas cards when Valentines day is so close and all you see everywhere is heart decorations and Christmas is so far away, but it was so nice to give out the cards I made last year to my friends and family, now I get to make a lot more and more people will get these.  Hope you enjoy looking at all the cards made by everyone, so please make sure you  start at the beginning of the hop -  So make sure you start with  Terri's site   http://terrisproul.blogspot.com/2011/11/festive-friday.html . Did you come here from  http://www.stinkydogdesigns.blogspot.com / ?, if not please go back and start from the beginning.  So I got a personal die cutting machine, and decided to play with it - after all it is my first time I make my own shapes - I had the chance to play around with some ink pads, some other products to make these cards.  I've been told all my li

Masquerading around!

Image
Here is the blank Mask I started with (three in  a pack) I did cut the eyes out a bit more because they  were way too small, I was not able to see so had to adjust just enough. - first step: paint the entire front of the mask, did about two coats -second step : painted the entire mask with pink glitter paint you see here -third step: used gloss mod podge to adhere the sequins one by one to the front of the mask - used black, silver and purple sequins, once the podge dried I went over the entire mask once again with the mod podge to make sure all sequins don't fall off  and to seal the paints used. Final step:  used hot glue to adhere all the feathers and gems used to complete the mask - sure wish I had  the hot glue helpers - sure burned my fingers way too many times.   Here is a picture of the other products used, besides the paints and the  mask.  Here is another mask I made - here you can see the paints I used for this mask step 1 - paint mask as des
Image
A friend asked me to make her a mask for a fund raising event and the theme is mardi gras - so this past weekend we had a pretty bad storm on Friday- so I decided to make the mask, well once just wasn't enough, so I made a total of six.  I decided to use sequins in different colors, mod podge, hot glue, mardi gras bead necklaces, some gems I had on hand, and some paper. I did painted one - but after I used the mod podge glimmer in gold - it covered the paint - it was my first time using this new mod podge product - it was ok, no problem there, now I know that it actually looks like paint when it dries - unlike the other mod podge products that dry clear. There were no patterns to follow, just did whatever came to mind at the moment, now I liked the end result on all the masks, but my favorites are the ones I used the white paper with black felt flowers. Leave a comment and tell me what you think, this is the first time making these type of masks, and have to admit it was fun

Festive Friday Hop!

Image
Good morning everyone and welcome to the  Festive Friday Blog Hop 2012.   Please make sure t o start at the beginning  back to Terri's site  http://terrisproul.blogspot.com/2011/11/festive-friday.html . Did you come here from  http://www.stinkydogdesigns.blogspot.com / ?, if not please go back and start from the beginning.  This is the first hop for 2012, looking forwards to making cards all year long.  Make sure to stop and look at every one's Christmas cards, enjoy! I'm so sorry for the delay but had computer problems at home today.  Here is my card, it is very simple but I like the ornaments. this is my first Christmas card for 2012 Here are all the supplies I used - the paper is from Martha's holiday stack Thank you for stopping by, and please  make sure to stop at Diane Tuggle's blog  http://stampininthevilliage.blogspot.com/

Rings, rings, rings......

Image
 RINGS, RINGS, RINGS........ you just can't have too many rings, not ever!!!! I LOVE making jewelry- and I love big Rings, specially if they have crystals - or should I say if I use crystals.  Above is a picture of the last rings I've done. I've done rings using wire, nylon thread, and now using Plaids ring findings, and Apoxie Sculpt.   Below I will add a couple of pictures showing all the materials used to make these rings.  Now as you can see, all I needed to make the ring was the apoxie, the crystals and Plaids silver ring finding, now since I used the clear crystals, I used the gray apoxie, I didn't like how the gray looked against all the sparkle from the crystals - so I used Tim's silver and with a blotter brush I brushed all the exposed apoxie on the ring, now it is silvery sparkly and LOVE wearing it - specially on a sunny day - you can see all the glittery lights just floating around.  Here is how the ring looked after the apoxie dried (picture

come check out this link! you might win something awesome!

http://hippiechickart.blogspot.com/2012/01/bajidoo-bangle-give-away.html?showComment=1326127028997#c7222023157004718951

come check out this link! you might win something awesome!

http://hippiechickart.blogspot.com/2012/01/bajidoo-bangle-give-away.html?showComment=1326127028997#c7222023157004718951

Ring of Hearts!

Image
Well finally got my shipment from Fire Mountain Gems.  I didn't pay attention to the size of the swarovski rhinestones I ordered, but turns out they were the perfect size for the ring I got.   Here is a picture of all the materials I used for this ring.  These is everything I used to make my ring Here is a closeup of the rhinestones and the ring blank Here is a picture of the apoxie - I used the white and the black - this is a two part so you have to use equal amounts of the colored apoxy and the gray - you mix them together until you no longer see the gray - otherwise it will not work. Here is part of the video I made to show how I made this ring using these 2 part apoxie, figure it would be easier to show, than typing the instructions.  The rest of the video is going on my youtube channel. 12 Hours later this is the finished ring, now this is the first ring I make using this blank ring and these incredibly tiny, tiny rhinestones, now I have no problem looking at

Mod Podging Around!

Image
So I wanted to share other projects I have done in the past using wood frames, acrylic & glitter paint by Plaid; sequins, paper, glitter, Quick Snippers and mod podge.  Now I am not or have I ever used the sequins that come all strung together, the ones I use are all lose and have tons and tons of these in different colors. So I decided to use them on these frames, now how long it took, who knows, all I know is it was a really long time, and it actually helped me to relax. I didn't do any sketches, once I started it all just took shape on it's own.  I Love each of these frames, but my two favorites are the multi color with different designs, and of course the one I made for my daughter's picture of her sweet 15th bday.   this is the "NICOLE" frame - I first painted it all in pink and used glitter while the paint was wet around the heart leaving enough space to add sequins to the border of the heart, I mod podge each sequin at a time.  trying to keep the pa

Decoupage Rose Fabric Pen

Image
I like to decoupage- so I try it on everything from wood to plastic to glass to just abut anything.  I made a pen for my sister it was covered with fabric - it was white with flowers outlined in black so I gave it color by using glitter mist - not sure the name but it looked like a pretty rose color, then I used Martha's new glitter paint - Well below you will see the steps and a brief description of how I did my sister's pen which is just like the one in this post. Now I could type the material names but figure the photo would be better, not shown on this photo is the heat gun  I used to dry the fabric faster after the  paint and modge podge was used So here is the piece of fabric all ready - used the glitter mist, the glitter paint and the heat gun to dry it up fast.  Here you can see I covered the pen with lots of fabric mod podge I did add some to the fabric too, and  after I rolled the pen on the fabric - I  cut the left over fabric off -  here is the pen al