I love to create, what? anything and everything - specially if I can paint it, too! I love to use my own sketches in all the stuff I paint, from fabric, to wood, to glass and beads, yes I like to make my own beads and paint them too!!!
The Art Type: DIY RUGS: "It amazes me how incredibly expensive large rugs are these days. Altogether, this DIY rug will cost around $40 depending on the type of fa..."
Welcome to our May Blog Hop - Sponsored by Expo International . Please start at the beginning,there's a "Treasure Chest of Trims" giveaway, all you have to do after visiting all the blogs comment on the DCC blog about your favorite projects to be entered to win!! simple right? Here is the link to the start point DCC Blog . I received some really fun trims from this company, as soon as I opened the package and saw them I knew I had to make some fun jewelry. I used the Deanna beaded pom pom trim which is approximately 1/2" in width to create my first project. I decided to increase the width of this trim by crocheting with some white beading wire and at the same time add some beads to match the tiny gold beads in between the pom poms, I added beading wire to each end of the bracelet to finish and add a clasp. Here is a photo of the Deanna beaded pom pom trim Below is a photo that shows some of the material...
Welcome to our DCC Blog Hop with Marabu Creative USA products. Make sure you start at the beginning of the hop click on the link above to start at the beginning. I love to paint and I jumped at the chance to try some of the products from this brand. This hop is sponsored by Marabu Creative USA products. Let me tell you a little bit about the two products I received. Porcelain & Glass Paint Markers these are high-gloss porcelain and glass paint markers. Ideal for painting on porcelain, ceramic, glass, Plexiglas and much more. Pump system with highly pigmented ink, these are dishwasher safe after hat setting, they are water based, easy to use, they are permanent once heat set, and are available in two nib sizes Porcelain Paints this is a medium viscosity and highly pigmented, water-based paint designed for glazed and unglazed ceramic. It can also be used on other surfaces such as Plexiglas, vinyl, and polypropylene. This pa...
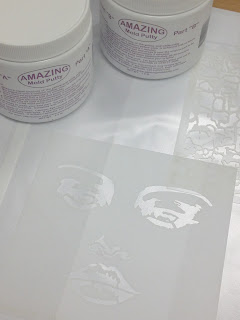
Hi there, this month our Design Team got creative with Amazing Casting Products along with products from StencilGirl Products . Make sure to visit every designer's blog to see what fun and amazing projects they created to share with you. I decided to use these two stencils, they just looked fun and I felt I could combine both by using the Amazing Mold Putty to make a mold of the two stencils. Below you can see the two products I used to get started. Be ready to see lots of photos, this mixed media project involved so many steps and days to complete, but I really hope you like it as much as I do. If you are not familiar with this product, Amazing Mold Putty is an FDA compliant 2 component silicone mold putty. It's very easy to use, take equal amounts of Parts A and B and mix it by hand until you have one uniform color (yellow), it takes about 20 minutes to cure, but due to climate changes it might take less or more to ...

A VERY CREATIVE WAY TO MAKE YOUR OWN RUG - check it out - spray glue to hold it together - cool idea
ReplyDelete