Just for You!!!!
I decided to create a small little album, that can be given as a Valentine gift. I figured the person giving this can either add messages, notes, quotes, photos that relate to both the giver and the person receiving this gift.
I have a lot of Maya Road albums, so I decided it was time to start using these. I took a pumpkin album and thought it looked like an upside down tulip flower, so I decided to go ahead and use it as if it was a flower.
First thing I did is added color to the album pages, I used an ink pad and well lets just say my hands ended up the same color too. Once all the ink was dried, I traced one album page on several pages of valentine scrapbook pages I had on hand. I used Quick Snippers to cut out the shape because it allows me to have 6 different design scissors on hand, all housed in one handy tool, it also includes a straight edge as you can see on the photos below, I used the straight edge to cut out around the sides and bottom of the shape, and then all the other design scissors were used to cut the tops, I had to cut these smaller than the page, I needed some of the inked pages to show.


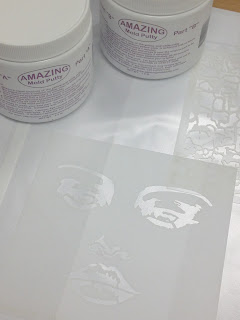
The photo below shows the top page of the album, I decided to use Rowlux film to go on the cover page, I love the transparency of this film but the white didn't work the way I wanted, you could see the cut out areas of the original pumpkin design, so I decided to use pink Rowlux instead and I only used it in the center of the page, I took different scrapbook papers to cover the sides of the front and back , and the pink Rowlux worked better with the rest of the papers and colors used, now I had all my pages done, cut and ready to be put together, I did use Glossy Accents to adhere the Rowlux to the album page.


I have a lot of Maya Road albums, so I decided it was time to start using these. I took a pumpkin album and thought it looked like an upside down tulip flower, so I decided to go ahead and use it as if it was a flower.
First thing I did is added color to the album pages, I used an ink pad and well lets just say my hands ended up the same color too. Once all the ink was dried, I traced one album page on several pages of valentine scrapbook pages I had on hand. I used Quick Snippers to cut out the shape because it allows me to have 6 different design scissors on hand, all housed in one handy tool, it also includes a straight edge as you can see on the photos below, I used the straight edge to cut out around the sides and bottom of the shape, and then all the other design scissors were used to cut the tops, I had to cut these smaller than the page, I needed some of the inked pages to show.
The photo below shows the top page of the album, I decided to use Rowlux film to go on the cover page, I love the transparency of this film but the white didn't work the way I wanted, you could see the cut out areas of the original pumpkin design, so I decided to use pink Rowlux instead and I only used it in the center of the page, I took different scrapbook papers to cover the sides of the front and back , and the pink Rowlux worked better with the rest of the papers and colors used, now I had all my pages done, cut and ready to be put together, I did use Glossy Accents to adhere the Rowlux to the album page.
 |
| Front page's first option, didn't quite work, so I moved on to other color option |
Front page of album
Back page of album
Now the fun part for me, is to put all the pages together, I went and looked for anything I could use for Valentine's day in my cabinet, I have like 6 drawers full of embellishments, and not to mention my own hand cut hand made flowers I make, I used these on the front page of my album (see photo of front page above).
On this photo you can see I took a Prima ink pad and added color to all the edges of the papers to give them a finished look.
Below, shows the glue I used to adhear all the papers to the album pages, this glue worked great on this project. It really is the first time I used it. I usually use glossy accents for all my paper crafting.
Now here are all my album pages glued together and waiting for the final embellishments.
I wanted to add individual photos of each completed page, but realized it would only make this post longer, so I decided to just show two photos, each shows all the album pages completed.
This photo shows the front side of the album pages
This photo shows the back side of all the album pages.
Now I could have added a lot more stuff, I've seen albums done by others with a lot of embellishments, that look stunning, but I decided to use less and leaving enough room so that the person getting this album can personalize it to her(his) liking. I hope you like this project, and that I've inspired you to get creative, make time for crafting, or get creative in your own way, whenever I find some #Cre8time I feel relaxed and accomplished.
Creativity is everywhere, in everything and in everyone!

Hi Maria.. lovely blog and craftwork! And great.. looking forward to seeing your journal pages. You can link up anytime of the week until 16th night. So will it be for every upcoming prompt.
ReplyDeleteI get now, I saw this on facebook, you used scalloped scissors, must dig mine out!
ReplyDelete