Hi there, this is Maria and today I want to share a fun project I made using some of my favorite crafting supplies.
I took two items I had at home, one is a wooden cat figure that has all these fun bright colors, and a tiny picture frame I received last year as part of a box of goodies my secrete Santa sent me.
First I had to chose what products to work with; Amazing Mold Putty, Amazing Casting Resin, and Alumilite Flo orange dye.
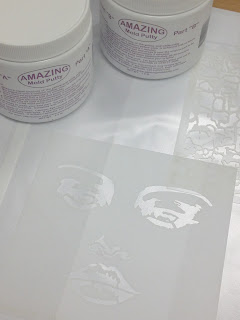
The Amazing Mold Putty comes in two containers part A (white) and part B (yellow) you take equal amounts of each and mix together until all you see is yellow, work fast for this putty sets up pretty fast. Once your putty is well mixed together you are ready to make your mold as seen in figure #1, it should only take between 10 to 12 minutes for the putty to set.
 |
| #1 - mold making of the picture frame |
Here in figure #2, you can see your mold is ready for resin.
 |
| Figure #2 picture frame mold |
Now you will do the same steps to make the mold for the cat's head as in Figure #3 mold making in process and Figure #4 cat's head mold is ready
 |
| Figure #3 - making the cat's head mold |
 |
| Figure #4 cat's head mold is ready |
Now it's time to chose the resin, since I like to paint my resin pieces after they are set I use the Amazing Casting Resin, this resin sets really fast, make sure to follow the instructions on the box, you must use equal amounts of parts A & B, if you add any color to your resin make sure you add this to part A and mix completely, then add part B and mix again. This resin takes very little time to mix, once you feel it getting warm, you know is ready and you have to move fast because it sets up pretty fast and since the weather affects it's time for curing, you need to make sure your molds are ready and always keep some extra on hand in case you have too much resin left over.
 |
| My resin and molds all ready |
I decided to add some orange dye into my resin, but since I mixed a lot of resin it ended up looking more like a light pink instead of orange, non the less it's fine since I planned to paint these two pieces.
Figure #6 below shows the resin as it cures, it goes from a clear orange to a milky light pink color.
 |
| Figure #6 |
Below are figures #7 & #8 they show the resin head and the finished piece. I used Viva Decor metallic gold red modeling cream for the entire head, then I used a little bit of turquoise embossing cream in the ears, used a black marking pen to do all the outlines on the ears and face, then I took a silver marking pen and added some designs on the face and ears for contrast.
 |
| Figure #7, cat's head ready for paints |
 |
| Figure #8, cat's head all painted |
Below are photos of the picture frame, before and after all the paints were added, figure #9 shows the new cast made, I am sorry the picture is a bit blurry, somehow they all came out the same. Figures #10 and #11 show the final frame, all colored with Viva Decor embossing and modeling cream paints. I wanted a distressed look for this frame, so I blended all the colors over each other as if there were layer underneath of all these different colors, to finish it up I used Tim Holtz's mini distress black soot ink pad.
 |
Figure #10 resin frame
 |
| Figure #11 front view of finished frame |
|
 |
| Figure #11 side view of finished frame |
Now that I had both pieces done, it was time to do something with both, I liked the idea of having the head as the image inside the frame, but I thought it needed some sparkle, so I looked around and found my O.P.I. nail polish, it's clear with tiny little crystals so I brushed these on the frame both on the outside and in the inside, then I took some wood beads I had and some chord and wrapped these on the side of the frame and a long bead that sits right below the head, I used some AdTech hot glue to glue the bead and the head in the frame. Below is a photo of the finished project. I really liked both pieces alone and together, there is so much I can see myself making with these two items, for instance I'm going to make some magnets with both, and the head can become all types of jewelry and fashion accessories.
I hope you liked this project, and come back again to see what else I create with these two items.


I absolutely adore this. So creative, so clever and such fun. So glad you came to share with us at Anything But A Card. Lisette (ABAC DT)
ReplyDeleteMaria this is such a cutie! I like how the tail is hanging on the side. Thank you for being our guest designer at Anything But A Card this month.
ReplyDeleteThanks so much for linking up to The Creative Exchange! xo, Laura
ReplyDelete