Thankful for Freedom!!!

Hi there, today I wanted to share a project I made to honor those who have served for our country. Freedom is something we should never take for granted, so many have served and sacrificed everything.
I wanted to make something that I could add some lights to so I used a glass block for crafting.
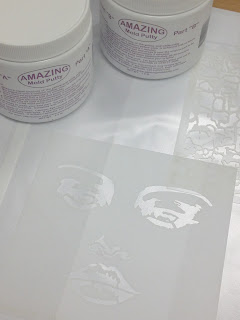
Etching a design on glass using Etching cream from etchall.com, next time to take out the etchmask and do some hand cutting.
Once you have all the etchmask pieces ready, before I removed the backing I placed the pieces on the glass until I had the design I wanted. I peeled all the pieces and placed them, this block is now ready for the next step.

Next it's time to apply the etching cream all over the glass, making sure to cover it completely, it's always good to add a lot of cream to make sure you don't miss any spots. I used a popsicle stick to add and spread the etching cream. It only takes 15 minutes for the etching to take place, once the time is up, make sure to remove all the cream and return it back to the jar, this product is reusable. Once you removed the cream, you can now rinse it off the glass, I do this under cool running water in the bathroom sink, make sure to read the directions on the bottle or at the website, to remove the cream safely.

Now, here you can see how the glass looks, all the areas that were covered with the etching cream look frosted, which is what you want, in case you missed any spots, you can go back and apply some more cream, wait the 15 minutes, rinse and it will etch for you.

Once you rinsed, checked the etched areas, dried your glass, make sure to remove all the etchmask from the glass, once you've removed everything go back and rinse your glass one more time. Here you can see me etched glass block, it's all done, and it's ready for some painting.

I decided to use some glass paints for this piece.

For this project I decided some of the painting will be done on the front of the glass, here you can see I painted all the stripes and the stars on the outside.


I left a few tiny stars alone, I figured once I add the blue paint, you will still be able to see the tiny stars. I can always go back and paint them in white if I change my mind.

Now it was time to add some white and blue to this piece, but I used a paint brush and my fingertips to add these two colors on the inside of the glass so you can still see the etched areas.

Here you can see the white paint has been applied on the inside but only on the areas where the red stripes are painted, now time to apply the blue paint.

Here's what the inside looks like, not to pretty but it is inside the glass so not to worry.

Here is the glass block all painted inside and out, ready for some more decorating.

I applied some black paint all around the glass glass block to create a frame, added some modpodge to apply some ribbon over the black paint.

I added a string of lights some inside the glass block and then the rest I wrapped them around the block. These multi function lights they have have 6 different settings and the 7th setting does all the others combined, they look very pretty in the dark.

Here is my finished piece, all decorated and ready for night time, so we can see all the pretty lights go on and off.

Material used:
DecoBloc - glass block for crafting
Pebeo mixed media paints
Etchall etching cream and etchmask
Popsicle mixing stick
Paint brushes
Lights
Ribbon


Comments
Post a Comment